
Frequently Asked Questions

RateMe.Club: One Code to Scan Them All

RateMe.Club is a redirection service that allows merchants to consolidate and manage all their social media review platforms in a single QR code or NFC tag.

📌 How RateMe.Club Works

  1. Merchants create a QR code or NFC tag using the RateMe.Club service.
  2. They select and update the preferred review platforms (Google, Yelp, Facebook, Instagram, Trustpilot, etc.).
  3. Customers scan the QR code (or tap an NFC tag) using their smartphone.
    • If multiple review sites are available, the customer sees a list and selects their preferred platform.
    • If only one site is enabled, the customer is instantly redirected to that review page.
  4. The review process remains seamless, and no personal data is collected.

🎯 Benefits for Merchants

  • One QR Code for All Review Platforms – No need to print and manage multiple QR codes.
  • Full Control – Easily add, remove, or update review sites anytime via a single dashboard.
  • Seamless Integration – Replace existing QR codes without affecting the customer experience.
  • Boosts Reviews from Influencers – Customers who are active on multiple review sites are more likely to post on more than one.
  • Works Across Print & Digital – Can be used on menus, receipts, signage, websites, and more.
  • No Need for Expensive Reputation Management Services – Everything is handled in a simple and efficient system.
  • Better Search Rankings – More reviews improve visibility on search engines like Google.
  • Merchant Analytics & Insights – Merchants can track engagement and see which review platforms customers prefer.

💡 Benefits for Customers

  • Simple & Convenient – One scan leads directly to the review page.
  • Choice of Review Platform – Customers pick where they want to leave their review (Google, Facebook, Yelp, etc.).
  • Instant Redirection – If only one review site is enabled, they are sent there immediately.
  • No Personal Data Collected – Customers remain in control of their privacy.
  • Saves Time – Eliminates the need to manually search for the right review page.
  • Encourages More Reviews – A frictionless experience increases the likelihood of customer feedback.

🌟 Why RateMe.Club?

📌 Optimized for businesses that want to streamline customer feedback across multiple platforms.

📌 Perfect for restaurants, hotels, service providers, and local businesses looking to improve their online reputation.

📌 Flexible, easy-to-use, and cost-effective compared to traditional review management tools.

🔗 Learn More: RateMe.Club

Yes, you can make as many copies as you like and use them anywhere you see fit. Once you own a QR code it is yours for life.

No, it is free, the only condition is you must have at least one QR code to manage. If you register with the account, but don't add a QR tag to your account will be deleted after 24 hours.

Currently there are only two ways to purchase a QR code, the first is from a vendor selling premanufactured display stands, table labels and such. Ebay is a good place to find a vendor close to you.

The second way is to purchase one online through this site, once purchased it will be viewable in your Tags page, from there you can download it and use it wherever you like.

To take ownership of this NFC card:

  1. Go to https://rateme.club and either login or create a new account.
  2. Go to the Tags Page and enter the Tag Number and its PIN in to the 'Adopt' fields.
  3. Give the Tag a name and attach it to a Site (Venue), (add a venue on the Venue Page if required).

NFC Tags for Venues

What is an NFC Tag?

An NFC (Near Field Communication) tag is a small, wireless device that uses radio frequency tech to share data with an NFC-enabled device (like a smartphone) when tapped or held close—within about 4 cm. It’s a tiny chip with an antenna, storing a small payload like a URL (e.g., https://rateme.club/tagcode), and it’s passive, meaning it powers up from the phone’s signal, no battery needed. In Australia, where tap-and-go payments are second nature, NFC tags feel intuitive and familiar.

How NFC Tags Redirect Venue Customers to https://rateme.club/tagcode

Here’s how you’d set this up for your restaurant, keeping Aussie diners in mind:

  1. Programming the Tag: Using an app like NFC Tools (free on iOS/Android), you write the URL https://rateme.club/tagcode onto the NFC tag. This link could lead to a review platform, a social media hub, or a custom page tied to your venue.
  2. Placement in the Restaurant: Embed the tag in a small polycarbonate (PC) display stand on tables—like a menu holder—or stick it on a bill folder, coaster, or counter sign. In Australia’s laid-back dining scene, a table stand works well; customers can tap while sipping a schooner or waiting for the bill.
  3. Customer Interaction: A customer taps their NFC-enabled phone (NFC on, common for contactless payments here) against the tag. Modern Aussie phones—iPhone 7+, Samsung Galaxy, etc.—detect the tag and prompt the browser or app to open https://rateme.club/tagcode. No QR code fumbling, just a quick tap—perfect for busy venues in Sydney’s Darling Harbour or Melbourne’s Federation Square.
  4. Outcome: The customer lands on https://rateme.club/tagcode, where they can choose which socials they want to go to, no searching for the venue or straying to the wrong site!

This is faster than QR codes and aligns with Australia’s tech-forward culture—over 90% of adults have NFC-capable smartphones (per 2023 data), especially in urban hubs.

Best Places to Buy NFC Tags in Australia for This Use Case

Since you’re redirecting to https://rateme.club/tagcode, you need tags with enough memory (at least 26 bytes, but NTAG213’s 144 bytes is standard and plenty) and options for small PC display stands. Here’s where to get them in Australia:

1. Officeworks (officeworks.com.au)

  • Offerings: Sells NFC stickers (e.g., Timeskey, $15–$25 AUD for 10) compatible with NTAG213 chips—perfect for your URL.
  • Small PC Display Stands: No pre-embedded NFC stands, but they stock clear polycarbonate sign holders (e.g., “A6 Portrait Stand” for $5–$8 AUD). Stick an NFC tag on or inside—DIY is quick and cost-effective.
  • Tip: Grab a pack of tags and stands in-store, test with your phone, and deploy same-day.

2. Jaycar Electronics (jaycar.com.au)

  • Offerings: NTAG213 NFC stickers ($3–$5 AUD each, or $20 AUD for a pack)—reliable and reprogrammable for https://rateme.club/tagcode.
  • Small PC Display Stands: No ready-made NFC stands, but they sell polycarbonate enclosures or acrylic bases ($5–$15 AUD). Embed a tag yourself with glue or tape—ideal for a custom setup.
  • Why Buy Here: Aussie-owned, with physical shops nationwide (e.g., Canberra, Hobart). Delivery’s fast if you’re regional—think $8–$10 AUD shipping.
  • Tip: Pair with their NFC reader ($20 AUD) to double-check programming.

3. eBay Australia (ebay.com.au)

  • Offerings: Search “NFC tags Australia” for local listings—10 NTAG213 stickers for $10–$20 AUD, shipped from Sydney or Melbourne.
  • Small PC Display Stands: Look for “NFC table stand” or “NFC display”—some sellers offer acrylic/PC stands with embedded tags ($15–$30 AUD each). Filter “Located in Australia” to skip slow overseas shipping.
  • Why Buy Here: Cheap and local, often with free shipping. Check seller ratings—aim for 4.5+ stars.
  • Tip: Search “NFC restaurant” for pre-made options suited to your use.

4. Local Custom Suppliers (e.g., Vistaprint AU or Signage Shops)

  • Offerings: Vistaprint (vistaprint.com.au) does custom table tents ($10–$20 AUD each)—add NFC stickers from Jaycar. Local signmakers (e.g., Signarama, Snap Printing) can craft PC stands with embedded tags ($20–$50 AUD each).
  • Small PC Display Stands: Get bespoke stands with your logo and NFC built-in—great for branding in trendy spots like Fitzroy or Newtown.
  • Why Buy Here: Local production, no import delays. Call for quotes—small runs (10–20 units) are doable.

Deployment Tips

  • Test It: Program https://rateme.club/tagcode with NFC Tools, tap with your phone, and confirm it works (NFC on, no lock on the tag).
  • Placement: Table stands are ace—put them where Aussies linger, like near the EFTPOS machine or condiment tray.
  • Signage: Add a “Tap to Rate Us” note—keep it cheeky, like “Give us a burl via rateme.club!”

This setup leverages Australia’s tech comfort and social media habits, driving traffic to your page with minimal fuss.

You can find the URL that needs to be written in the Tag information in the Tags page next to NFC Code: It will look like this 'https://rateme.club/0000000'

You will need to download and install NFC Tools (free) onto your phone. Click here to see how you use the application to program your NFC Tag.
RateMe.club Display

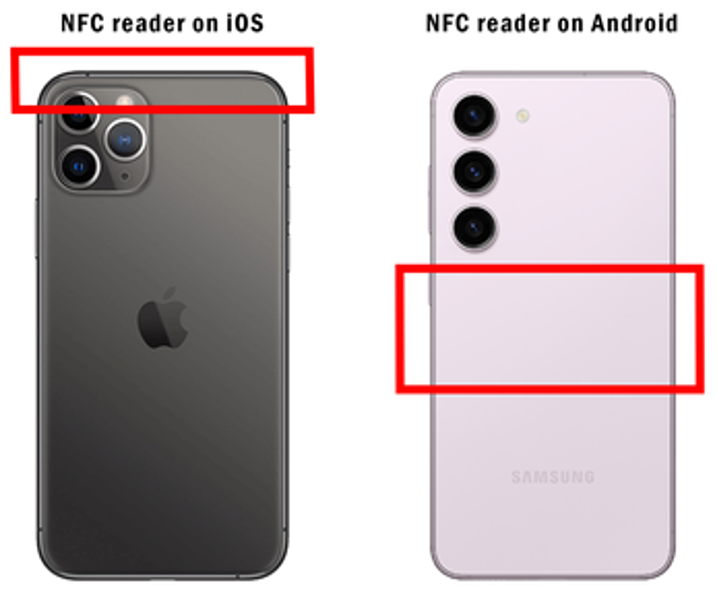
Different phones have their NFC readers in different locations, generally, iPhone are near the top of the phone and others are in the centre.

The NFC chip in all Rateme.club cards are in the centre of the card.

How to Read an NFC Tag Containing a URL on Android and iPhone

1. Android: Reading an NFC Tag with a URL

Android devices with NFC support can natively read NFC tags with a URL and open the browser automatically.

A. Check if Your Phone Supports NFC

  1. Go to Settings.
  2. Search for "NFC" in the settings search bar.
  3. If available, turn NFC ON.

B. Scan the NFC Tag

  1. Ensure the phone is unlocked.
  2. Hold the back of the phone near the NFC tag (usually near the middle or top of the device).
  3. If the NFC tag contains a URL, Android should automatically show a notification or open the browser.

C. If It Doesn't Work

  • Some phones require enabling "NFC Unlock" or "NFC Reader Mode".
  • Try using an NFC reader app like:
    • NFC Tools (free on Play Store)
    • NFC TagInfo by NXP
    • Trigger - Task Launcher

D. Adjust Settings if Needed

  1. Go to Settings > Connected Devices > NFC Preferences.
  2. Enable Android Beam (if available).
  3. Make sure "Allow reading NFC tags" is enabled.

2. iPhone: Reading an NFC Tag with a URL

A. Native NFC Support (iPhone XS, XR, 11, 12, 13, 14, 15)

  1. NFC is enabled by default.
  2. Simply bring the iPhone near the NFC tag.
  3. If the NFC tag contains a URL:
    • A notification appears at the top of the screen.
    • Tap the notification to open the URL in Safari.

B. For Older iPhones (iPhone 7, 8, X)

  1. Older iPhones require an NFC scanning app to read tags.
  2. Download an NFC reader app like:
    • NFC Tools (free on App Store)
    • NFC TagInfo
    • NXP NFC Tag Reader
  3. Open the app and scan the NFC tag.

3. Additional Notes

  • Ensure the NFC tag is correctly formatted (Use NDEF format, and URLs should have https:// or http://).
  • Check your phone’s NFC position:
    • Android: Near the top or middle back.
    • iPhone: Near the top rear edge.
  • Your phone case might block NFC (especially if it's metal).
  • If your phone doesn’t support NFC, you won’t be able to read tags.

Final Summary

  • Android: Enable NFC and tap the tag.
  • iPhone: Newer iPhones read NFC tags natively; older ones need an app.
  • If scanning doesn’t work: Use an NFC reader app or check if the tag is properly formatted.

How to Get a QR Code for Your Instagram Business Reviews

Follow these steps to create a QR code that sends customers directly to your Instagram review page.

Step 1: Get Your Instagram Review Link

  1. Open the Instagram website or the Instagram mobile app.
  2. Log in to your business account.
  3. Navigate to your business profile by clicking on your username or profile picture.
  4. To direct users to your profile, copy the URL from the browser’s address bar:
    • Example: https://www.instagram.com/yourbusiness/
  5. Alternatively, if you want to direct users to a specific post requesting reviews, locate the post and:
    • Click on the three dots (⋮) at the top-right of the post.
    • Select Copy Link.
    • This link can be used for your QR code.

Step 2: Save in your rateme.club Venue

  1. Log in to your account and go to the Venues page.
  2. Select the venue where you want to display the connection.
  3. Add the reviewer if they are not already listed.
  4. Disable the Enable checkbox, if it is enabled.
  5. Click the Edit URL button on that line.
  6. Enter the Instagram review URL as requested.
  7. Enable the reviewer and test the QR code to ensure the link is working.
  8. If there are any issues, disable the reviewer and review your work.

How to Get a QR Code for Your Google Business Reviews

Follow these steps to create a QR code that directs customers to your Google Business review page.

Step 1: Get Your Google Review Link

  1. Log in to your account and go to thet Find Business page.
  2. Search for the busines name.
  3. Copy the link to the Clipboard

Step 2: Save in Your rateme.club Venue

  1. Go to your Venue on the Venues Page.
  2. Select the venue where you want to display the connection.
  3. Add the reviewer if they are not already listed.
  4. Disable the Enable checkbox, if it is enabled.
  5. Click the Edit button on that line.
  6. Paste the URL from the clipboard.
  7. Enable the reviewer and test the QR code to ensure the link is working.
  8. If there are any issues, disable the reviewer and review your work.

How to Get a QR Code for Your Facebook Business Reviews

Follow these steps to generate a QR code that directs customers to your Facebook Business reviews.

Step 1: Get Your Facebook Review Link

  1. Go to Facebook and log in.
  2. Navigate to your Facebook Business Page.
  3. Click on the "Reviews" tab in the left-hand menu.
  4. Copy the URL from the address bar of your browser.

Step 2: Save in your rateme.club Venue

  1. Log in to your account and go to the Venues page.
  2. Select the venue where you want to display the connection.
  3. Add the reviewer if they are not already listed.
  4. Disable the Enable checkbox, if it is enabled.
  5. Click the Edit URL button on that line.
  6. Enter the URL as requested.
  7. Enable the reviewer and test the QR code to ensure the link is working.
  8. If there are any issues, disable the reviewer and review your work.

How to Get a QR Code for Your Yelp Business Reviews

Follow these steps to create a QR code that sends customers directly to your Yelp review page.

Step 1: Get Your Yelp Review Link

  1. Go to Yelp and search for your business.
  2. Click on your business name to open its Yelp page.
  3. Click on the "Write a Review" button.
  4. Copy the URL from the address bar of your browser.

Step 2: Save in your rateme.club Venue

  1. Log in to your account and go to the Venues page.
  2. Select the venue where you want to display the connection.
  3. Add the reviewer if they are not already listed.
  4. Disable the Enable checkbox, if it is enabled.
  5. Click the Edit URL button on that line.
  6. Enter the URL as requested.
  7. Enable the reviewer and test the QR code to ensure the link is working.
  8. If there are any issues, disable the reviewer and review your work.

How to Get a QR Code for Your TripAdvisor Business Reviews

Follow these steps to create a QR code that sends customers directly to your TripAdvisor review page.

Step 1: Get Your TripAdvisor Review Link

  1. Go to TripAdvisor and search for your business.
  2. Click on your business name to open its TripAdvisor page.
  3. Scroll down and find the "Write a Review" button.
  4. Click on the button to open the review submission page.
  5. Copy the URL from the address bar of your browser.

Step 2: Save in your rateme.club Venue

  1. Log in to your account and go to the Venues page.
  2. Select the venue where you want to display the connection.
  3. Add the reviewer if they are not already listed.
  4. Disable the Enable checkbox, if it is enabled.
  5. Click the Edit URL button on that line.
  6. Enter the TripAdvisor review URL as requested.
  7. Enable the reviewer and test the QR code to ensure the link is working.
  8. If there are any issues, disable the reviewer and review your work.

How to Get a QR Code for Your OpenTable Business Reviews

Follow these steps to create a QR code that sends customers directly to your OpenTable review page.

Step 1: Get Your OpenTable Review Link

  1. Go to OpenTable and search for your restaurant.
  2. Click on your restaurant name to open its OpenTable page.
  3. Scroll down and find the "Write a Review" or "Leave Feedback" section.
  4. Click on the button to open the review submission page.
  5. Copy the URL from the address bar of your browser.

Step 2: Save in your rateme.club Venue

  1. Log in to your account and go to the Venues page.
  2. Select the venue where you want to display the connection.
  3. Add the reviewer if they are not already listed.
  4. Disable the Enable checkbox, if it is enabled.
  5. Click the Edit URL button on that line.
  6. Enter the OpenTable review URL as requested.
  7. Enable the reviewer and test the QR code to ensure the link is working.
  8. If there are any issues, disable the reviewer and review your work.

How to Get a QR Code for Your OpenRice Business Reviews

Follow these steps to create a QR code that sends customers directly to your OpenRice review page.

Step 1: Get Your OpenRice Review Link

  1. Go to OpenRice and search for your restaurant.
  2. Click on your restaurant name to open its OpenRice page.
  3. Scroll down and find the "Write a Review" or "Post Review" button.
  4. Click on the button to open the review submission page.
  5. Copy the URL from the address bar of your browser.

Step 2: Save in your rateme.club Venue

  1. Log in to your account and go to the Venues page.
  2. Select the venue where you want to display the connection.
  3. Add the reviewer if they are not already listed.
  4. Disable the Enable checkbox, if it is enabled.
  5. Click the Edit URL button on that line.
  6. Enter the OpenRice review URL as requested.
  7. Enable the reviewer and test the QR code to ensure the link is working.
  8. If there are any issues, disable the reviewer and review your work.

How to Get a QR Code for Your TheFork Business Reviews

Follow these steps to create a QR code that sends customers directly to your TheFork review page.

Step 1: Get Your TheFork Review Link

  1. Go to TheFork and search for your restaurant.
  2. Click on your restaurant name to open its TheFork page.
  3. Scroll down and find the "Write a Review" or "Leave a Review" button.
  4. Click on the button to open the review submission page.
  5. Copy the URL from the address bar of your browser.

Step 2: Save in your rateme.club Venue

  1. Log in to your account and go to the Venues page.
  2. Select the venue where you want to display the connection.
  3. Add the reviewer if they are not already listed.
  4. Disable the Enable checkbox, if it is enabled.
  5. Click the Edit URL button on that line.
  6. Enter the TheFork review URL as requested.
  7. Enable the reviewer and test the QR code to ensure the link is working.
  8. If there are any issues, disable the reviewer and review your work.

How to Get a QR Code for Your Trustpilot Business Reviews

Follow these steps to create a QR code that sends customers directly to your Trustpilot review page.

Step 1: Get Your Trustpilot Review Link

  1. Go to Trustpilot and search for your business.
  2. Click on your business name to open its Trustpilot page.
  3. Scroll down and find the "Write a Review" button.
  4. Click on the button to open the review submission page.
  5. Copy the URL from the address bar of your browser.

Step 2: Save in your rateme.club Venue

  1. Log in to your account and go to the Venues page.
  2. Select the venue where you want to display the connection.
  3. Add the reviewer if they are not already listed.
  4. Disable the Enable checkbox, if it is enabled.
  5. Click the Edit URL button on that line.
  6. Enter the Trustpilot review URL as requested.
  7. Enable the reviewer and test the QR code to ensure the link is working.
  8. If there are any issues, disable the reviewer and review your work.

How to Get a QR Code for Your Zomato Business Reviews

Follow these steps to create a QR code that sends customers directly to your Zomato review page.

Step 1: Get Your Zomato Review Link

  1. Go to Zomato and search for your restaurant.
  2. Click on your restaurant name to open its Zomato page.
  3. Scroll down and find the "Write a Review" or "Rate and Review" button.
  4. Click on the button to open the review submission page.
  5. Copy the URL from the address bar of your browser.

Step 2: Save in your rateme.club Venue

  1. Log in to your account and go to the Venues page.
  2. Select the venue where you want to display the connection.
  3. Add the reviewer if they are not already listed.
  4. Disable the Enable checkbox, if it is enabled.
  5. Click the Edit URL button on that line.
  6. Enter the Zomato review URL as requested.
  7. Enable the reviewer and test the QR code to ensure the link is working.
  8. If there are any issues, disable the reviewer and review your work.

How to Get a QR Code for Your Travelfish Business Reviews

Follow these steps to create a QR code that sends customers directly to your Travelfish review page.

Step 1: Get Your Travelfish Review Link

  1. Go to Travelfish and search for your business.
  2. Click on your business name to open its Travelfish page.
  3. Scroll down and find the "Write a Review" or "Add a Review" button.
  4. Click on the button to open the review submission page.
  5. Copy the URL from the address bar of your browser.

Step 2: Save in your rateme.club Venue

  1. Log in to your account and go to the Venues page.
  2. Select the venue where you want to display the connection.
  3. Add the reviewer if they are not already listed.
  4. Disable the Enable checkbox, if it is enabled.
  5. Click the Edit URL button on that line.
  6. Enter the Travelfish review URL as requested.
  7. Enable the reviewer and test the QR code to ensure the link is working.
  8. If there are any issues, disable the reviewer and review your work.

How to Get a QR Code for Your Snapchat Business Profile

Follow these steps to create a QR code that sends customers directly to your Snapchat profile.

Step 1: Get Your Snapchat Profile Link

  1. Open the Snapchat app on your phone.
  2. Tap on your Bitmoji/avatar in the top-left corner to open your profile page.
  3. Find the Snapcode (yellow box with dots) on your profile page.
  4. Tap on the Snapcode and select "Share Snapcode" or "Save to Camera Roll" to download it as an image.
  5. Alternatively, tap the Share Profile button and select Copy Profile URL.
  6. The copied link will be in this format: https://www.snapchat.com/add/yourusername

Step 2: Save in your rateme.club Venue

  1. Log in to your account and go to the Venues page.
  2. Select the venue where you want to display the connection.
  3. Add the reviewer if they are not already listed.
  4. Disable the Enable checkbox, if it is enabled.
  5. Click the Edit URL button on that line.
  6. Enter the Snapchat profile URL as requested.
  7. Enable the reviewer and test the QR code to ensure the link is working.
  8. If there are any issues, disable the reviewer and review your work.